| 일 | 월 | 화 | 수 | 목 | 금 | 토 |
|---|---|---|---|---|---|---|
| 1 | 2 | 3 | ||||
| 4 | 5 | 6 | 7 | 8 | 9 | 10 |
| 11 | 12 | 13 | 14 | 15 | 16 | 17 |
| 18 | 19 | 20 | 21 | 22 | 23 | 24 |
| 25 | 26 | 27 | 28 | 29 | 30 | 31 |
- EUC-kr
- badi
- fi
- 방화벽
- 스마트폼
- 오라클 함수
- 가계부
- UTF-8
- 머니플랜
- SAP
- function
- 동적 쿼리
- ABAP
- ole
- gimp
- ALV
- EXIT
- 엑소버드
- FI 용어정리
- KOSA
- Java
- Standard Function
- selection screen
- alv 정형화
- Enhancement
- List box
- 유닉스
- Smart Forms
- sapa
- 이명박
- Today
- Total
Drunken Lion
[WDA] WEB DYNPRO 에서 Dropdown 만들기 본문
출처: http://www.sapdev.co.uk/sap-webapps/sap-webdynpro/wdp-dropdown.htm
Below are the simple steps required to add a field to your abap web
dynpro which displays a dropdown list of values to the user using the
dropdown by index UI element..

Step 1- Create context to store dropdown values Within your web dynpro application
You need to create a context node to store the dropdown values, this
will generally involve using a structure which contains a code and a
text value i.e. you will display the
text value to the user but reteive the code value for internal
processing! For this example I will use fields CARRID and CARRNAME from
structure SCARR to create the
dropdown list.
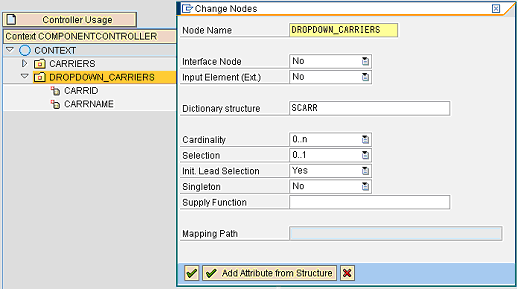
First double click on the COMPONENTCONTROLLER(with inleft hand
tree structure) and select the 'Context' tab. Now add a new node
to the context node (right click the context and select
Create->Node). Give the new node a name and enter which table
structure you want to base it on (i.e. SCARR).
Also rememeber to set the cardinality to 0:n (or 1:n) to denote a table.
You will also need to click the 'Add Attribute from Structure' button
and select the
fields you want to use for your drop down table i.e. CARRID and
CARRNAME.

Step 2 - Map context to VIEW
Within the Context tab of your view drag the context you have just
created (DROPDOWN_CARRIERS) from the right hand window and drop it onto
the context node in the left window,
select yes from the popup window that asks you if you want to copy and
map context.

Step 3 - Create dropdown UI Element
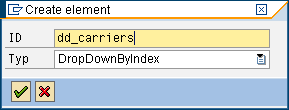
Within the layout tab of the view, right click on the
ROOTUIELEMENTCONTAINER within the UI element hierarchy and select Insert
Element, Now Select DropDownByIndex and give it a name.
See here for more details on creating ABAP Web Dynpro UI element

Step 4 - Assign Dropdown Ui element to Context
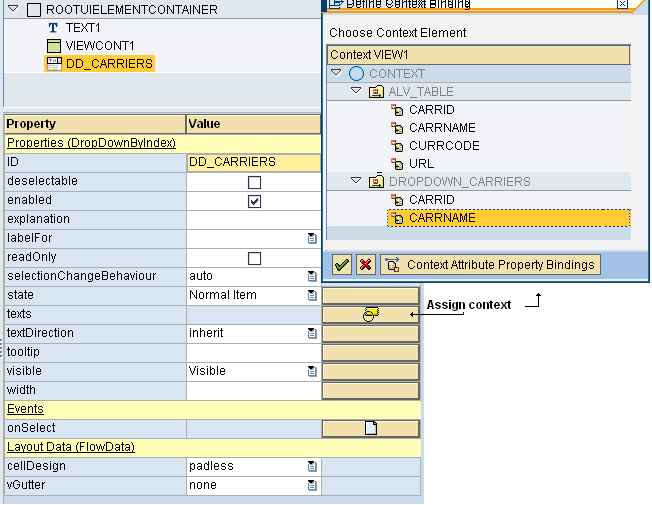
Click on your UI element within the Layout tab, you will now see all the
properties for this element which can be changed. You now need to
assign the field within your created context
which you want to be displayed in the drop down i.e. for the example it
will be the CARRNAME field within context element DROPDOWN_CARRIERS. To
do this simply click on the button
at the end of the 'texts' property, the one with a yellow square and
circle on it!

Step 5 - ABAP code to populate dropdown list
Insert the following ABAP code into the appropriate place. For this example it will go into the WDDOINIT method
* create local data variable to access context information
  Data: context_node type ref to if_wd_context_node.

* create table based on context structure
  Data: it_carriers type STANDARD TABLE OF if_view1=>element_DROPDOWN_CARRIERS,
        wa_carriers like line of it_carriers.

  select *
    from scarr
    into table it_carriers.
  context_node = wd_context->get_child_node( name = 'DROPDOWN_CARRIERS').
  context_node->BIND_TABLE( it_carriers ).
Step 6 - Save, Activate and Run
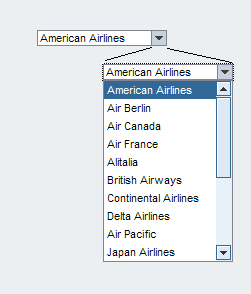
Save and activate your abap web dynpro, now when you execute it you should see a drop down object similar to the following:

'SAP > ABAP' 카테고리의 다른 글
| ABAP TIP 03 (0) | 2012.09.20 |
|---|---|
| 스마트폼 한글 자료 (0) | 2012.07.03 |
| 이벤트를 이용한 back job 실행 (0) | 2012.04.09 |
| GENERATE SUBROUTINE POOL (0) | 2012.03.07 |
| 세무서 제출용 양식에 공백 처리 (1) | 2012.02.24 |
